Advanced Gapshot Techniques
These gapshot techniques are key to any player's high score. We all know what gap shots are, but do you know how to make them effectively? Unlike other guides which focus more on chains and combos, this guide has more emphasis on gapshots.
Advantages of gapshots
Advantages
- High number of points especially with a good multiplier (with a three ball width double gap, the last 30 seconds of one of my higher-scoring games had around 130k points per second)
- Can get you up the leaderboard very quickly (on low level boards)
- Single gaps are quick to set up
Disadvantages
- Multiple gaps takes a long time (~30-40 secs) to set up
- Need fast reflexes (at least to set up)
- Some strategy required to set them up and maintain
- Low scores or death if double gap setup fails or collapses due to misses or bad combination of balls
Techniques
There are various techniques for making gap shots, in order from easiest to do to most points.
Double Tap
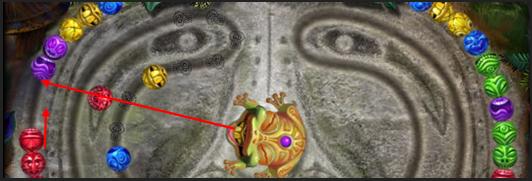
This technique has been explained in one Tiki Talk video, and involves firing two of them, with the first ball you fire creating a gap, and the second ball creating a gap shot. In this image below, we have a green ball waiting to be fired, and a blue ball as the reserve. Seeing a direct line where green-blue can be fired to create a gap, both of them are fired as fast as possible. The green one will destroy the first layer of balls while the blue ball will sail right though and get max points (10k) for a gap shot. For this to happen there must not be a gap in the first place, and the first match must not be at the end of the ball curve. It can be utilized for both high scores in Zuma Blitz and in Zuma / Zuma's Revenge to finish levels quickly.
Note: Double Taps do not work on Kroakatoa Island.
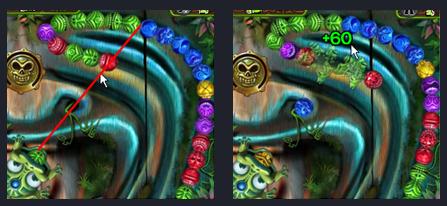
Gap at the End This is helpful if you wish to gap at the end. Say your current ball can clear the ball at the front of the curve. You can place a non-matching ball at the end, create a gap, and shoot through it.
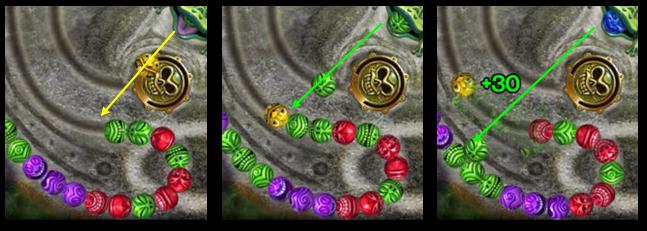
Potential Large Gap Splitter
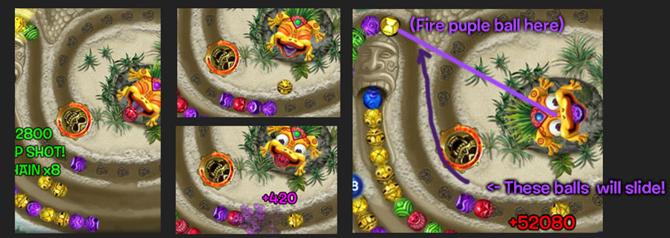
You have a group of seven red balls, you have one yellow and one red. How do you make an effective gap? Split the group of red balls in half using the yellow ball, and, depending on which side you can make gap shot with the ball in your reserve, clear one side using the red ball, and shoot through it. Your gap score will increase significantly compared to just using a red ball and double tapping, since any gap after the first isn’t worth a lot.
Triple Tap
This can be essentially useful when doing a double tap, but there’s a fruit in the way. Your swapped ball will take care of the fruit while your third ball is equal to a double tap if you're quick enough.
Repeated Gap Shots
On curves which wraps around itself, you can continuously make gapshots so as long as you have the right combination of balls. For two different curves, you need to keep the row of balls down on one side. On a standard three-ball gap, you get around 25% less points compared to a double tap (15% if it's a two ball gap)
Double Tap (large gap)
This is the double gap version of the double tap. Although this earns twice as many points as the double tap, using the Double Tap^2 version is generally recommended. At certain occassions this transitions to Repeat Gap Shots x2.
The triple gap version can be performed on the Serpentine board for 50% more points.

Double Repeat Gap Shots
Same as repeat gap shot, but using a double gap configuration. A three ball gap nets 50% more points than a double tap for each successive shot, while a two ball gap earns 70% more. As a tip, try to align the gap so that it's perpendicular to the frog.
Double Tap^2
A cross between the double repeat-gap shot and double tap, it leaves a small three-ball width opening while double tapping at the same time. Successful use yields around 260k per double tap. It has been used to get the near-8M score on the Sweet Shot board, as well as the only known way to exceed 10M on Secret Smile / Leaping Lava
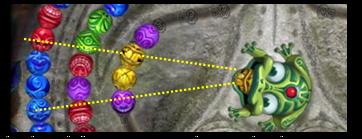
A double repeat gap trick leads to this if you fail to keep the ball curve near the beginning and you lose a gap.
The triple gap version present on the Serpentine Board nets 30% more points than a double tap.
Setup Tactics
Fast Deployment
The key here is deployment time. You obviously need a lot of time to set this up (around 25 seconds for pro players and 30-40 seconds for average players), and you must grab multipliers and time balls while you’re at it. If you don’t, your double gaps might not be worth much as you might expect and in some cases you might run out of time before you can even use your double gap.
The best tactic would be a combination of laying down as many balls on one side as possible, and then forming sets of two balls in order to make gaps and combos earlier in the curve.
Holes to prevent sliding
If you create lots of holes, and one slides back, there is a 20% chance of the next hole sliding back if you don’t think ahead. Multiple holes decrease the chance of your gap or double gap setup from breaking apart.
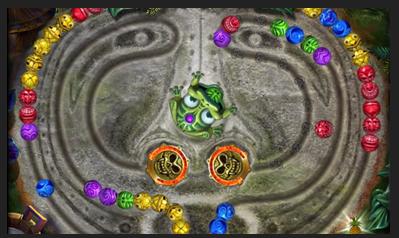
Two holes created. If the first four ball group were to slide back, it would
not disrupt the double-gap preparations.
Safety Ball
When doing double gaps that cover both curves, you might need safety balls for one of them. They are designed to protect your double gaps from being only single gaps. In the event that the first ball happens to roll back, you will still have a ball or two on the other side to be considered a double gap.

Creating a gap opening with one isolated ball
After making holes, you might notice that balls might slide back, creating one isolated ball. There are two ways of doing this, one is slightly riskier than the other as there’s a chance the ball you fired may miss or disrupt your two ball chain. Instead of firing purple first (right image) and then two blues, a blue could be added, then a purple, and then two more blues to create a gap.
Two balls around the blue ball, purple to the left, red to the right just after the red combo.
Choose which color to match 3 depending on the area you want to cover with double gaps.
With two isolated balls (same color)
Place two different colored balls on both ends, and clear the original group of two isolated balls. You won’t be flexible with the gap firing angle though.
With two isolated balls (different colors)
You can actually expand in two different directions, one being the purple route, the other the red. Both give you different aiming options.
With three or more balls
Follow the instructions the one isolated ball after surrounding it with two balls. You’re extremely flexible on how you want your final gap firing angle to turn out.
Moving your gap opening slightly
If you are for some reason unsatisfied with your opening, just add a few more balls, and make a match in a slightly different location.

You can push the gap back, but it's harder to do this.
Maintaining the Gap
Keeping the curve down while you build up
You can set up double gaps, but you have to find a way to prevent those balls from going too far to the point where you can’t make them anymore. Don’t focus on getting double gaps all the time – you will need to keep the curve down at all times. Avoid making matches near the end of that curve – you may accidently cause one (or both) of the balls forming your gap to slide back.
Use Hot Frog wisely
Although are you are tempted to destroy as many balls as possible with hot frog, you can do so to lessen the incoming curve, but don’t fire blindly. Shoot in a position so that when it explodes, the resulting explosion will not cause your gap setup to slide back, nor will it destroy any balls forming your gap. The explosion will destroy balls in a 3-4 ball radius, so don’t aim too close.
Use Combos to your Advantage
Sometimes the best way to maintain it is to make combos - they cause balls to roll back and prevents them from moving for a second or two, allowing you to discard balls in order to prepare that next double gap. (Good players can time it so that a ball that makes a match hits the curve at the same time the balls roll back.)
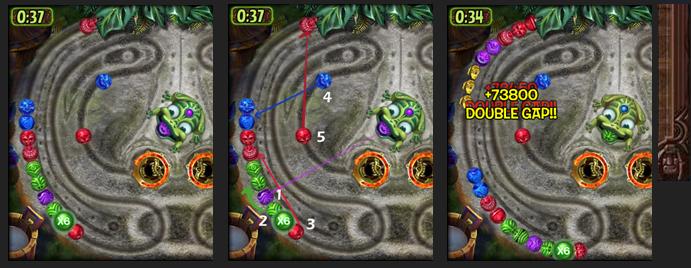
Thinking ahead
Thinking ahead is a crucial step in holding your double gap formation. In this example, you’ve got two purple balls in your queue. You might be tempted to shoot two purples in the 2nd diagram below (1), causing the green balls to roll back and giving you a multiplier (2). But wait! As soon as the multiplier gets activated, the red ball rolls back (3) and creates a match, the blue ball then rolls back (4), reducing your double gap value significantly. It matches, and in this diagram, a red ball is all the way at the beginning. Guess what? The red ball (5) rolls back, removing any trace of your double gap structure, and you’ll most likely ragequit. Sure it will cause a curve clear (worth 22,600 points at this point in the game), but the gap’s gone, and you're done.
Special Cases
Slide Stopper
If you realize your next shot is causing your curve to slide back, you can quickly fire another one at one of the gap edges, or make another match to prevent a slide.

Quick thinking saved this double gap setup from being destroyed, causing only a minor slide.
Extending the large gap
Useful only for a large first gap setup, this extends the size of your large gap by a bit, as well as slowing down the speed of the curve for a few seconds. Although this might be helpful in some cases, this is generally a last resort method to saving your double gap setup, and your time should be best used to finding matches that would make combos to slide back balls earlier in the curve.
Reducing the size of your gaps
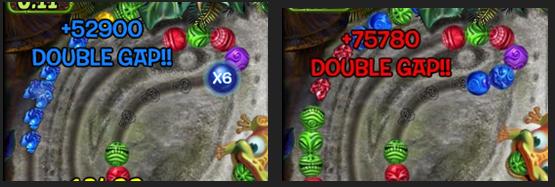
On high multipliers the point difference is significant. The top has a gap value of 52900 (4900 + 130*6 x5), the second has a gap value of 75780 (6,120 + 130*3 x6). Two ball gaps are high valued, but it's much easier to miss and block the gap.
Powerup Grab from the Gap Edge
So, what happens in the event that (this occurs frequently) when one of the two balls forming the gap contains a powerup? Do you ignore it or go for it? There are a few strategies for this one.
You would need to build up a group of two balls the same color as the powerup ball you’re grabbing, and then a colored ball that’s not the same color as the one all the way at the back, or the one on the other edge (in this case, not purple or blue. Shorten the gap and proceed as usual.

Grabbing a multiplier on one edge? No Problem. But two is more than what you might be able to handle.

I hate games where time balls show up like this.
Pure Luck
You might have only a split second to plan ahead especially at higher speeds, and you might not always make the best decisions especially when they’re moving fast, but you will improve over time. Typically these huge cascading situations are very rare, but thankfully you usually need to think about whether or not your match will cause a rollback or two. If the curve rolls all the way back to the start for any reason, pray that the ball under the starting point isn't the color that causes one (or both) of the gap balls to slide back!